If you’re a coffee lover seeking a simple yet flavorful way to brew your own espresso at home, look no further than the trusty moka pot. This humble stovetop contraption, also known as a macchinetta or a caffettiera, has been a staple in Italian households for decades. But how exactly does one use a moka pot to make stovetop espresso? Fear not, for we have all the answers you seek, whether you’re a first-time moka pot user or simply looking to perfect your brewing technique. Join us on a journey to unlock the secrets of this charming little kitchen tool and discover the joys of homemade espresso.
Choosing the Right Moka Pot
Consider the Size
When choosing a moka pot, it’s important to consider the size that suits your needs. Moka pots come in various sizes, typically ranging from 1 to 12 cups. If you’re an individual who enjoys a single cup of espresso, a smaller size, such as a 1 or 3-cup moka pot, would be ideal. However, if you’re brewing espresso for a larger group or enjoy multiple cups throughout the day, a larger capacity moka pot would be more suitable. Consider your daily consumption and the number of people you’ll be serving espresso to when selecting the size of your moka pot.
Choose the Material
Moka pots are commonly made from either aluminum or stainless steel. Each material has its own advantages, so it’s important to choose the one that suits your preferences. Aluminum moka pots are excellent heat conductors, which allows for a quicker brewing process. On the other hand, stainless steel moka pots are more durable and less likely to corrode over time. Consider factors such as heat conductivity and durability when deciding between aluminum and stainless steel moka pots.
Check the Design
The design of a moka pot can also play a role in your decision-making process. While most moka pots have a traditional octagonal shape, some models feature sleek and modern designs. Additionally, pay attention to the handle of the moka pot. Ensure that it is ergonomic and heat-resistant for safe and comfortable handling. Consider the overall aesthetic and practicality of the design when selecting a moka pot that suits your style and needs.
Preparing the Moka Pot
Clean the Moka Pot
Before brewing your first cup of espresso, it’s essential to clean the moka pot thoroughly. Disassemble the moka pot and wash each part with warm water and mild soap. Pay close attention to the filter basket and the rubber gasket, as these parts can accumulate coffee residue and oils. Rinse all the components thoroughly to remove any soap residue, which could affect the flavor of your espresso. Regular cleaning and maintenance will ensure that your moka pot remains in optimal condition.
Fill the Water Chamber
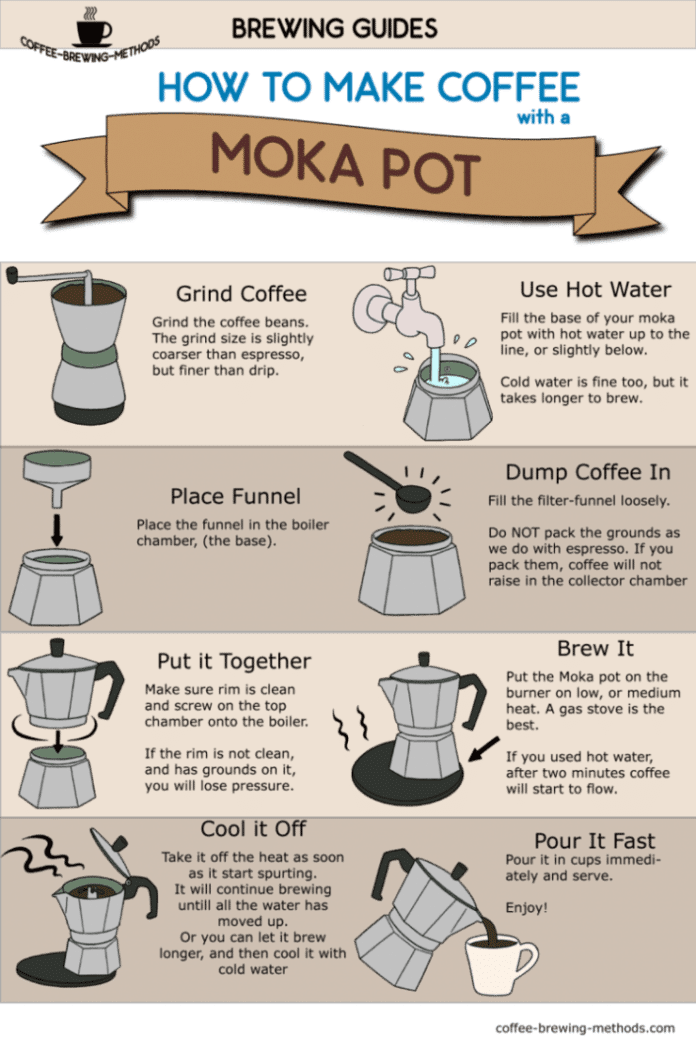
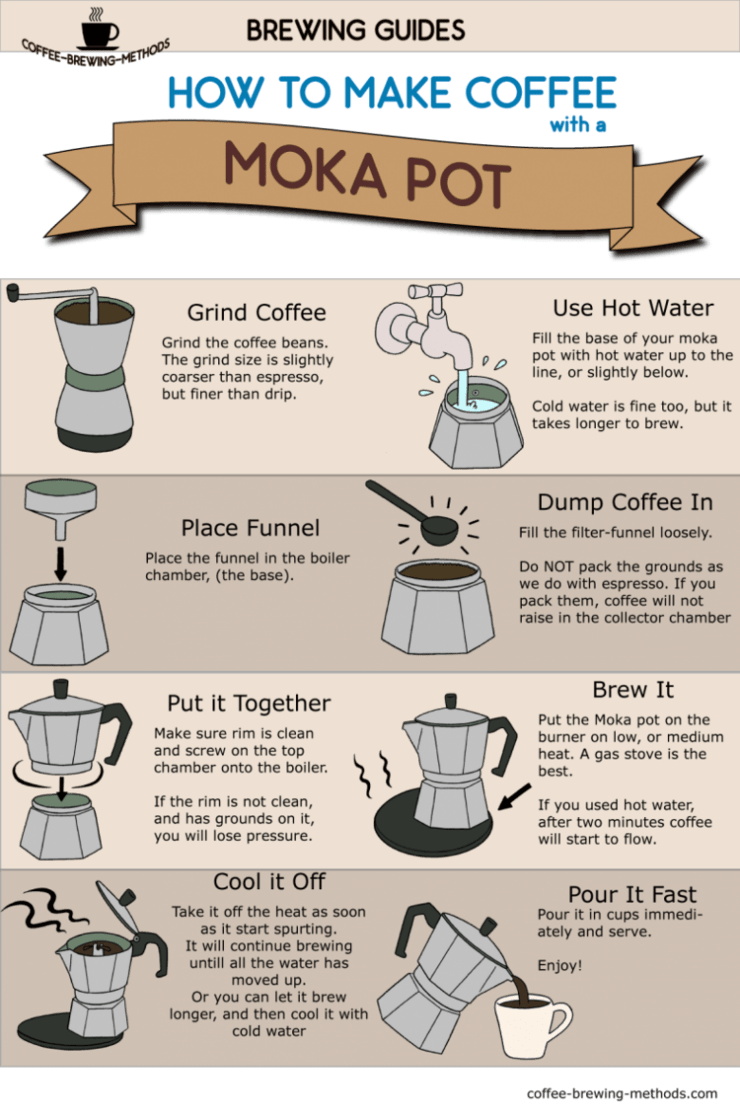
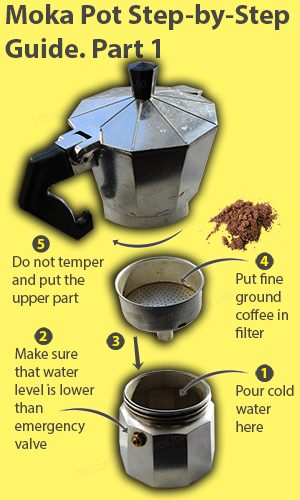
The water chamber of the moka pot is responsible for generating steam, which forces the hot water through the ground coffee and produces the espresso. Fill the water chamber with fresh, cold water up to the designated level indicated inside the pot. Avoid overfilling, as it may result in water leaking out during the brewing process. Using filtered or bottled water can also contribute to a better-tasting espresso by reducing any impurities that can affect the flavor.
Add Ground Coffee
Next, add finely ground coffee into the filter basket. It’s crucial to use the right amount of coffee to achieve the desired strength and taste. A general guideline is to fill the basket with coffee without overpacking it. Level the coffee grounds with a finger or a coffee tamper to ensure an even extraction. Experiment with different coffee-to-water ratios to find the perfect balance for your taste preferences. Remember, the quality and freshness of the coffee beans will also greatly impact the overall flavor of your espresso.
Assembling the Moka Pot
Attach the Bottom and Top Chambers
To assemble the moka pot, ensure that both the bottom and top chambers are clean and dry. Screw the top chamber onto the bottom chamber tightly but be cautious not to overtighten, as it may make it difficult to unscrew the pot later. The two chambers should fit snugly together to prevent any steam from escaping during the brewing process. Double-check that there are no coffee grounds on the rim of the filter basket or any other part that may interfere with a proper seal.
Ensure Proper Sealing
Proper sealing is essential for a successful brew. The rubber gasket, often referred to as the O-ring, ensures a tight seal between the top and bottom chambers. Over time, the gasket may become worn or lose its elasticity. Before assembling the moka pot, inspect the gasket for any signs of damage or deterioration. If necessary, replace the gasket to maintain a proper seal. A good seal between the chambers will create the necessary pressure for a flavorful extraction and prevent any leaking during the brewing process.
Brewing Espresso on the Stovetop
Select the Right Heat Source
When brewing espresso with a moka pot, it’s important to choose the right heat source. Gas stovetops are generally the most compatible, as they provide precise temperature control. However, electric stovetops can also be used successfully by adjusting the heat to a medium-low setting. Avoid using high heat to prevent burning the coffee grounds or damaging the moka pot. Induction stovetops are not suitable unless you have a specially designed moka pot made for induction heating.
Heat the Moka Pot Slowly
To ensure a smooth brewing process and avoid any burnt flavors, it’s crucial to heat the moka pot slowly and evenly. Place the moka pot on the stove over low to medium heat. Heating it too quickly can result in an uneven extraction and a bitter taste. Slow and gentle heat allows the water to rise gradually, creating the optimal pressure for brewing. Always monitor the heat and adjust it accordingly to maintain a steady flow of hot water through the coffee grounds.
Watch and Listen for the Brewing Process
As the water in the bottom chamber heats up, it will start to create steam pressure, which pushes the hot water through the coffee grounds and into the top chamber. Pay close attention to the brewing process, as it will help you gauge the timing and ensure that you stop the heat at the right moment. Keep an eye on the transparent knob on the top chamber, as the espresso will start flowing into it. You’ll also hear a characteristic gurgling sound, indicating that the brewing process is nearing its end.
Managing the Steam Pressure
Prevent Overheating
Managing the steam pressure is crucial for achieving the perfect extraction. One common issue with moka pot brewing is overheating, which can lead to burnt or bitter flavors. To prevent overheating, remove the moka pot from the heat source as soon as you notice a steady flow of espresso into the top chamber. Leaving it on the heat for too long can result in the coffee becoming over-extracted and losing its flavors and aromatic compounds.
Release Steam Pressure
After removing the moka pot from the heat source, it’s important to release the built-up steam pressure before serving the espresso. This can be done by placing the bottom chamber of the moka pot under cold running water or gently tapping it on a heat-safe surface. Releasing the steam pressure prevents any residual steam from forcing the coffee out of the spout and ensures a safe and controlled pour. Be cautious while handling the moka pot, as it will still be hot after brewing.
Pouring and Serving
Remove from Heat Source
Once you’ve released the steam pressure, it’s time to remove the moka pot from the heat source. Use oven mitts or a kitchen towel to protect your hands from the hot surfaces as you carefully take it off the stove. Avoid placing the hot moka pot directly on sensitive surfaces to prevent any potential damage.
Wait for a Few Seconds
Before pouring the espresso, allow the moka pot to rest for a few seconds. This brief period allows the coffee to settle and enhances the flavors. It also gives the espresso a chance to cool slightly, making it more enjoyable to drink. Patience is key in this step in order to fully savor the aroma and taste of your homemade espresso.
Pour the Espresso
With the moka pot in one hand, slowly and steadily pour the espresso into your cup. Aim for a controlled pour to prevent any spillage or splashing. The spout of the moka pot is designed to deliver a smooth stream of espresso directly into your cup. Fill the cup to your desired level and savor the rich and robust flavors of your freshly brewed stovetop espresso. Feel free to add any additional ingredients such as sugar or milk according to your personal taste preference.
Cleaning and Maintenance
Allow the Moka Pot to Cool
After enjoying your cup of espresso, it’s important to allow the moka pot to cool before disassembling it for cleaning. The metal components retain heat and can cause burns if handled immediately after brewing. Give your moka pot some time to cool down to a safe temperature before proceeding with the cleaning process.
Clean the Parts Thoroughly
To maintain the quality and longevity of your moka pot, it’s crucial to clean all the components thoroughly after each use. Disassemble the moka pot and wash each part with warm water and mild soap. Pay special attention to the filter basket, rubber gasket, and the inside of the water chamber, as these are the areas where coffee residue and oils tend to accumulate. Use a gentle brush or sponge to remove any stubborn stains or oils. Rinse all the parts thoroughly to remove any soap residue.
Store Properly
Once your moka pot is clean and dry, store it in a cool and dry place. To prevent any potential damage or scratches, it’s advisable to keep the parts of the moka pot disassembled during storage. This also allows for better airflow and helps prevent any lingering moisture or odors. Keep the moka pot away from direct sunlight or heat sources that could affect the integrity of the materials.
Troubleshooting Common Issues
Weak or Bitter Espresso
If your espresso turns out weak or bitter, there are a few factors to consider. Firstly, check the coffee-to-water ratio. Adjust the amount of ground coffee to find the right balance for your taste preferences. Additionally, ensure that you’re using fresh and properly ground coffee. Stale or incorrect grind size can lead to an imbalanced extraction. Lastly, pay attention to the brewing time and heat control. Brewing too quickly or with excessive heat can result in a less than desirable flavor profile.
Leaking or Spurting Coffee
Leaking or spurting coffee during the brewing process can be indicative of a faulty seal or excessive heat. Check the rubber gasket and the seal between the top and bottom chambers to ensure a proper connection. Replace the gasket if necessary. If the issue persists, adjust the heat to a lower setting to prevent excessive steam pressure, which can cause the coffee to forcefully escape from the metal spout.
No Coffee Flow
If you’re experiencing no coffee flow despite proper assembly and heat application, there are a few areas to troubleshoot. Check the filter basket for any blockages caused by coffee grounds or residue. Clean the filter basket thoroughly and ensure an even distribution of coffee grounds. Additionally, confirm that the water chamber is filled to the appropriate level and the moka pot is properly sealed. Experiment with different grind sizes and coffee-to-water ratios to find the perfect combination for optimal flow.
Experimenting with Variations
Adjusting Coffee-to-Water Ratio
One of the joys of using a moka pot is the ability to experiment with different coffee-to-water ratios. This allows you to customize the strength of your espresso according to your preference. If you prefer a bolder and stronger cup, increase the amount of coffee grounds. On the other hand, if you prefer a milder taste, decrease the amount of coffee grounds. Remember to adjust the grind size accordingly to maintain a balanced extraction.
Trying Different Grinds and Beans
Another way to explore the versatility of a moka pot is by experimenting with different grind sizes and coffee beans. Finer grind sizes typically result in a stronger and more concentrated espresso, while coarser grind sizes may produce a smoother and milder cup. Play around with various grind settings to find the perfect balance. Similarly, try different types of coffee beans with varying flavor profiles to discover new and exciting taste experiences.
Adding Flavors or Frothed Milk
If you’re feeling adventurous, you can take your moka pot espresso to the next level by adding flavors or frothed milk. Consider adding a touch of vanilla or caramel syrup to enhance the sweetness and aroma of your espresso. You can also froth some milk separately and pour it on top of your espresso to create a creamy and indulgent beverage. These variations allow you to personalize your espresso and elevate your coffee-drinking experience.
Tips for a Great Moka Pot Espresso
Use Freshly Roasted Coffee Beans
To achieve the best flavor and aroma in your moka pot espresso, it’s essential to use freshly roasted coffee beans. Coffee beans gradually lose their flavors and aromatics over time, so it’s recommended to purchase whole beans and grind them just before brewing. Look for coffee beans with a roast date to ensure freshness. This way, you can fully enjoy the complex flavors and nuances that freshly roasted beans have to offer.
Grind the Coffee Right Before Brewing
The freshness of the coffee doesn’t stop at using freshly roasted beans. To maximize the potential of your moka pot, grind the coffee right before brewing. Grinding the beans releases the aromatic oils and flavors, which rapidly dissipate once exposed to air. Invest in a good quality burr grinder to achieve a consistent grind size, as this greatly influences the overall extraction and taste of your espresso.
Preheat the Water
While preheating the water may not be essential, it can contribute to a more efficient brewing process. Preheating minimizes any temperature fluctuations that can occur during the brewing, resulting in a more consistent extraction. Simply boil some water separately while you prepare the coffee grounds and assemble the moka pot. Pour the hot water into the water chamber before starting the brewing process. This step ensures that the water is already heated and ready to generate steam when placed on the stove.
With these comprehensive steps and tips, you’re well-equipped to embark on a flavorful journey of brewing espresso using a moka pot. Enjoy the process, savor the aroma, and delight in the rich flavors that this traditional stovetop brewing method has to offer. Cheers to countless cups of homemade espresso and the joy it brings to your daily coffee ritual!


